
So, it has been mentioned before on this blog that Keiko and Company have their own TARDIS.
Up until this point, I didn't actually have a TARDIS for them,
but I had plans to make them one eventually.
(Actually, I had plans to make it over spring break,
but didn't)
Well, given the recent development with Josefina's mysterious arrival,
as well as the fact that summer vacation has just begun,
I decided it was time for their TARDIS to be realized.
But I didn't just want a large blue-painted box for them.
First of all, that takes a lot of space to store, and I don't have a lot of space,
so I wanted it to be able to fold flat (well, almost flat).
And not only did I want it to be able to fold flat, but given that it's a TARDIS,
it also needs to be BIGGER ON THE INSIDE.
So, being the geniuses that we are, we devised a design that accomplished both goals
and turned out fantastic, if we do say so ourselves.
And since I know I can't be the only person out there with dolls who love Doctor Who,
I took pictures of the process so anyone else who wants to build their own TARDIS can make one of their own.

Want to see how we did it? Click to read on and find out!
(Also, given that this is a how-to post of an intensive craft project,
this post is VERY photo-heavy.
Ye have been warned.)
YOU WILL NEED:
4 tri-fold boards, about 39" x 27.5" (we got ours from Dollar Tree)
Pencil
Yard stick
Woodworker's squares-- we'll explain what these are in a minute
Toothpicks
Acrylic paint-- in at least royal blue, black, and white, and then whatever colors you want for the inside of your TARDIS
Acrylic paint pen, in black (and any other color you want)
White glue
Glue sticks
Paper-- recycled paper and plain printer paper
Acrylic paint pen, in black (and any other color you want)
White glue
Glue sticks
Paper-- recycled paper and plain printer paper
Heavy-duty scissors
X-Acto/craft knife-- KIDS, GET AN ADULT'S HELP WITH THIS!
Okay, let's get started!

First, sketch out an approximation of what you want the inside of your TARDIS to look like.
We started by drawing the tri-fold boards, and the door in the middle part of the left-hand board,
then went from there.
You can make this as elaborate or as simple as you want.
You can base it off of one of the canon Doctor's TARDISs or make up your own.
We really like the way the interior of the Eleventh Doctor's TARDIS
-- at least, the TARDIS he had when he was traveling with the Ponds--
had a lot of stairs and different levels to it.
It gave a really good impression that the TARDIS was very expansive inside.
Plus, StoryTeller's favorite architectural detail is cool staircases.
So we sketched a design that gives the appearance of multiple levels and hallways leading to deeper in the TARDIS,
with a cool staircase as a focal point.

Here, our lovely assistant McKenna is showing you how the base of our TARDIS
is going to be constructed.

The basic box of the TARDIS is formed with two tri-fold boards, partially opened and set standing together like this.
We will not glue them together, we will leave them separated, because not only will this allow us to fold it flat for storage...


...but it also allows us to open it up as a backdrop, making it BIGGER ON THE INSIDE!
Now, the first thing we're going to do is translate our sketch on the paper to a sketch on the boards themselves.

We start out by drawing the door. Now, for a really simple TARDIS, we could put the doors on the "tab" sides of the boards, allowing us to "open" and "close" the doors by moving the tabs.
But we want to do a more complicated/detailed hinge, so we're going to put the door on the center section of one of the boards.

We'll use the yardstick to measure out a good height for the door.
We want our door to be a fair bit taller than the dolls themselves, but not super tall.
We decide to place the top of the door at about 23 inches from the floor.

Remember those "woodworker's squares" I mentioned in the supplies?
Okay, we don't know exactly what they're called
(we borrowed them from StoryTeller's dad),
but they are these L-shaped metal things that help you draw 90-degree angles.
They're also marked like a ruler along the edges.
They're really useful for drawing long, straight lines, and you should be able to find them at any hardware store.

We're going to use the larger square to help us draw the doors with nice,
straight lines and 90-degree angles.

First, we put the long end of the square against the fold in the board to make sure it's nice and straight, and make a mark at 23".

Then, resting the short side of the square against the fold,
we put the long side across the board, and draw a line for the top of the door.
Also, previous to this, we used the yardstick to draw a line across the bottom of the door for the threshold. It's about 1.5" high.

Now we'll draw the long side of the door.
We line up the short side with the line we just drew across the top...

...and put the long side against the fold, but this time on the INSIDE, giving us space around the side of the door. We draw the line on the inside of the square.
Then we repeat it on the opposite side for the other side of the door.

We wanted to double-check that our door looked like it was the right size with two dolls standing next to each other,
so McKenna was joined by Keiko the Brilliant to see how it looked.
McKenna: Keiko, quit editorializing.
Keiko: It looks like the right size to me!

Now we draw a nice, straight line down the center of the doors using the square again.

Now we divide the door in eighths.
We won't do anything with these lines right now,
but it's easier to draw them while the doors are still attached to the rest of the cardboard.

Now, time to sketch the rest of our TARDIS interior!
We use our earlier sketch as a guide.

For our TARDIS, we have three large circles to the left of the door.
We use a cup lid to draw these on a central guideline.

We also have this big, curving pillar-thing that spans the two flaps that are in the center of our backdrop, so we sketch that next.

Now, time for the more complicated part: The staircase and the other levels.
Using McKenna for comparison and scale, we sketch the curve of the floor that leads to the stairs.

Now, we figure our roughly where our horizon line is going to be.
We aren't going to get really picky with perspective
--Okay, I tried to get picky with perspective, but gave up--
but we still want a rough guide as to where the doll's (and camera's) eye-level will often be.
The dolls' eyes are about 15.5" high, so we drew a faint line at that level across our board.

As I mentioned, I tried to be technical with perspective.
I really did.
But I gave up because it was beyond my abilities and ended up using a photo of a similar curving staircase as a way to roughly approximate the curve of this staircase.
Besides, once we start painting, those lines are going to get a little blurry anyway.
Overall, though, it turned out pretty cool.
The sketch on the boards didn't turn out exactly like the sketch on the paper, but it follows the general idea and it looks cool anyway.

The sketch of the inside is finished! Time to start painting!
For this next part, we headed out to our art room.
Please excuse the mess in the background.
It's not really a designated art room so much as a "garage-like space that's used for extra storage and also messy projects like painting and gluing."
Anyway.

Before we start painting, we use the X-Acto knife to cut out the doors and the windows at the top of the doors, then covered the raw edges of both the doors and door frame with strips of recycled paper.
We used our big metal square as a straight edge to run the knife along to get good, straight cuts.
We'll repeat this warning again:
KIDS, GET AN ADULT'S HELP WHEN USING AN X-ACTO OR CRAFT KNIFE!
They're really, really sharp and they cut really deep!
It's not worth getting stitches for a craft project!

We use some paper plates as well as the pieces that we cut out of the door windows to paint some paint samples, then propped them up against the boards to see what they look like when placed vertically.
We're using metallic gold and silver paint, so when we turn it vertically, the light reflects of it differently, so we wanted to be sure that we liked how it looked.

Time to start painting!

We started off with the plain gold and painted the center of each of our curving pillars.
We did two coats to get it nice and solid.

Then we mixed the gold with a drop of dark brown to do the sides of the pillars, to give the effect of shadows and dimension.

While that was drying, we painted the outside-- the brown side--
of the doors with our royal blue paint.

Once that was dry, we glued strips of paperboard that we had painted black on one side across the windows for the trim, with the black side facing down because this is the trim that will be visible on the inside of the door.
Now, if we were to do this again, we probably would just use a black paint pen instead of going this route because the black paint pen is easier.
But this did turn out cool.

Here's the one side --mostly-- painted.
We sponge-brushed (well, actually, we used a wadded-up paper towel) some black paint over certain parts of the silver floor to give it some shading and a sense of depth.
Also, the walls aren't really that salmon-colored in real life. They're a much more muted peach-ish beige.
The white dots are also supposed to be lights.
They kinda ended up looking more like polka-dots, but whatever.

The trim pieces on the doors have dried, so it's time to put on the windows themselves.

Now, you could just use white paint and paint white squares on for the windows.
That's fine, too.
But we wanted our windows to be able to glow if we put a light inside the TARDIS, so we cut rectangles out of white printer paper and glued them across, on the blue side of the door.

Then we put more pieces of black trim over the windows.
If the outside/blue-side edges of the windows don't look finished right now, that's okay.
We'll be adding blue trim to frame them later.

Then we painted the inside of the doors with some white paint, and put white paperboard on the inside edges of the doors, as well as across the guidelines we drew earlier to add the trim details on the inside of the doors without adding a lot of bulk to them.
We happened to have paperboard that was already white; if you don't have white paperboard, you can always paint it.

Once the paint on the backdrop was thoroughly dry, we used our black paint pen to draw out the railings of the stairs over our sketched guidelines.
We also used a bit of black paint to paint the window that's down on the left-hand side.

Time to start painting the outside! We got a great big bottle of primary blue paint for this.
We focused mainly on the folding edges, and also the center of the sections.
The area at the top and also some of the edges will be covered later with blue-painted trim, so we don't have to worry about painting those.
To get a nice, solid blue, we had to use two coats.

On the outside of the left-hand door, we glue on the phone box sign,
which we made on Microsoft Word using a text box.
The light edges on the doors are from the paper wrapping the edges.
We aren't too worried about these, as they'll be mostly covered when we add the trim pieces.

Now, time for the trim pieces!
We just realized that we didn't take a picture of our sketch of the trim pieces before we cut them out and painted them.
But basically, we took one of our extra tri-fold boards
and used it to measure and draw out all the trim pieces that we need for the front board of our TARDIS,
then cut them out with scissors.
Since we're cutting cardboard with these scissors,
use nice, big, fairly-sharp scissors,
but don't use your favorite paper-cutting scissors,
and for the love of ice cream,
don't use sewing scissors!
From left to right, above, we have:
2 vertical trims, to go on either side of the door opening
1 narrow horizontal trim, to go under the threshold of the door
1 wide horizontal trim to go across the top, above the door
3 total vertical trims to go on the side flaps
2 total wide horizontal pieces to go on top of the side flaps
2 total narrow horizontal pieces to trim the bottom of the flaps
and 6 short, narrow pieces to frame out the "shadow boxes" on the flaps.

Here's a random picture to show how we added stars to the black-painted window.
Let the paint on the trim pieces dry overnight, and then it's time to start gluing!

To glue on the trim pieces, we draw squiggly lines with white glue, then press the trim piece down where it's supposed to go.

One irritating thing we discovered during this project is that cardboard likes to curl when it's been painted,
especially if it's only been painted on one side.
So in order to hold our trim pieces in place while they were gluing,
we had to weight it down with a bunch of stuff,
such as extra paint bottles, spray-paint cans,
even a wooden board (with waxed paper underneath to keep IT from getting glued to our TARDIS).
The weights did keep it in place, though, and nicely flattened out the intact tri-fold boards, which had also begun to curve after we painted the inside of the TARDIS.

We let the center section dry for several hours to make sure the glue was holding the curling cardboard down before we moved on to the side sections.
We made sure to glue down white pieces of paper for the windows before we glued on the trim pieces.
We had to dig out even more extra jars, bottles, and random semi-heavy objects to weigh down all those little pieces of cardboard.

Aaaand this is why it's good to be sure your drop cloth is clean before you set something down, especially if you're pressing it down.
We were weighing the doors down, trying to get THEM to stop curling, and apparently there was some not-quite-dry blue paint on our drop cloth.
We can touch this up later, if we want to, but for now we'll say that it's from that time that McKenna's paintball gun misfired in the TARDIS.
McKenna: It was hilarious! Cecile looked like a smurf!
Cecile: A very ANGRY smurf.

Here's half of our TARDIS after all the glue is dry!
We recommend using the paint pen to draw on the black lines in the windows AFTER you're finished with the trim.
We drew ours on beforehand, and they turned out kinda off-center.
It's not too obvious, though.
Also, take note that there is a long trim piece that hangs off of the right-hand flap above...

...but NOT on the left-hand flap.

That way, when we close our TARDIS, this flap can overlap with the other one. But, more importantly, when we set up the front piece and the back piece next to each other, this extra, overlapping piece of trim will help them look like one solid wall.

Time to work on trimming the doors!
First, we set them next to each other, and measure the center part.
It's a smidge over 1".
We also measure the rest of the way around the doors to get the measurements for those trim pieces.

Now, using the large, door-sized piece that we cut out from the center of the board when we cut out the trim to go around the door,
we draw vertical lines for the vertical trim pieces on the doors.

After cutting these out, we lay them on the doors to see if they're the right size.
...And realize that our doors are still curling.
ARGH.

Time to try weighting them down some more...
(We actually ended up moving these off the table to sandwich them between this board and another board on the floor, with a giant dictionary on top, and left it overnight.
That helped a lot.)

Time to trim the back part of our TARDIS!
This time, we remembered to take pictures of the trim pieces before we cut them out.
First, we cut the flaps off our remaining tri-fold to make it more manageable, then drew out the trim for the back-most panel:
3 vertical trim pieces
1 horizontal top trim piece
1 horizontal bottom trim piece
6 trim pieces to outline the little shadow boxes-- we drew these by finding the center of the space we had left, and drew a line down, then drew three lines across.

We highly recommend labeling these, because you're going to end up with a lot of little blue-painted rectangles of cardboard.
Since we'll be painting the brown side of the cardboard, our labels on the white side will still be visible after it's painted.

Then we grabbed one of the flaps we cut off, and began drawing out the trim for the side flaps.
On one, we drew one horizontal top, one horizontal bottom,
and all three verticals that we need.
On the other, we just cut out one top and one bottom,
and then we used the leftover cardboard from cutting out the shadowbox trim piece for the other board to cut more shadowbox trim pieces for this one.

See what I meant by a lot of little rectangles of cardboard?

Lots and LOTS of blue rectangles of cardboard....

We glue on the trim the same way we did with the other half of the TARDIS, using boards and other random objects to weight it down.

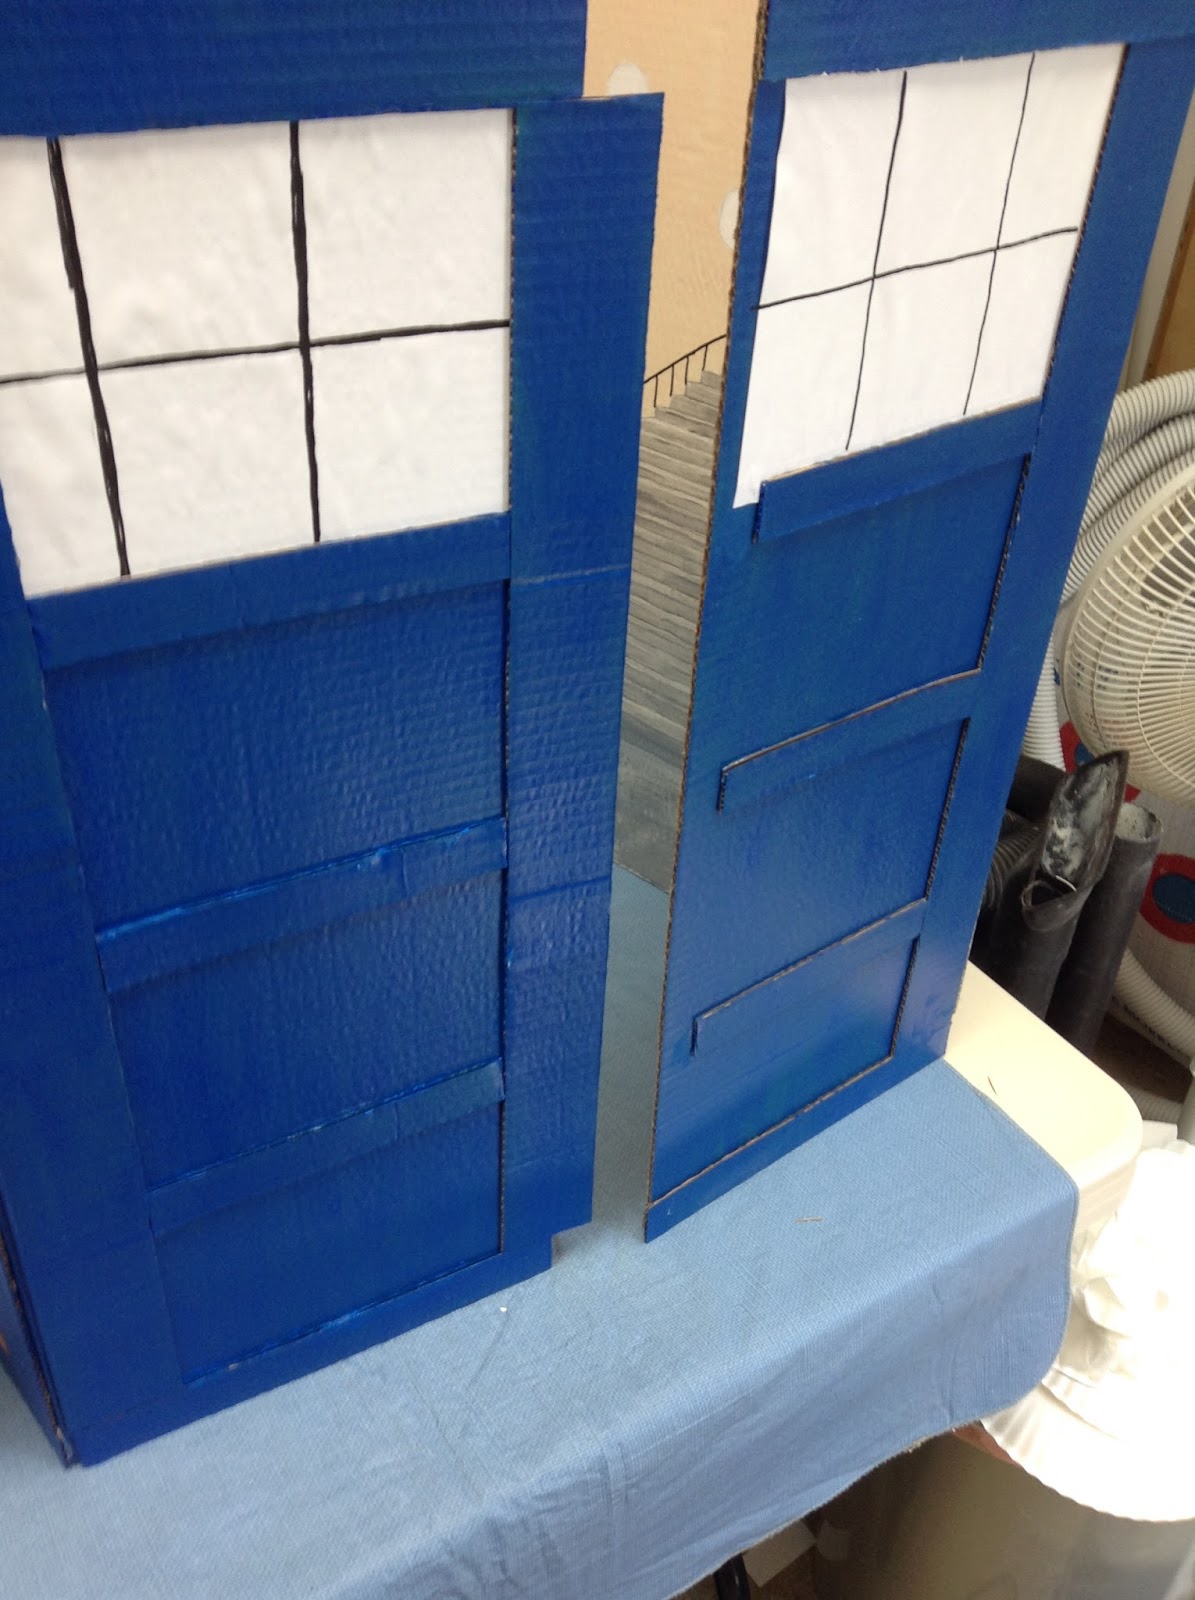
Here it is after all the glue is dry-- we let it dry overnight with the weights on it.

And here it is after we used the paint pen to draw on the lines in the windows.

And here are both halves of our TARDIS, set up together!
Now we just need to deal with those pesky, curling doors....

Fortunately, the doors were mostly flattened out,

but we still had to put a bunch of stuff on them to weigh down the little cardboard strips.

Here's a closer picture so you can see how we framed the window and the "Pull to Open" sign.

While the doors were drying, we noticed that the top raw edges of the trim pieces were kinda obvious, so we decided to do something about that.
So we took a little brush and some blue paint and did some touch-up to hide it.
On the left is one we touched up; the right one is one that we hadn't done yet, to show you the difference.

And here are the doors, all dry!
Notice that ONLY THE LEFT DOOR has the central, vertical trim piece.
That is because this piece overlaps with the right door, just like it does in the real TARDIS.

Time to install the doors!
We used some blue painter's tape to carefully hold them in place while we made sure that everything fit.

Here's how it looks from the outside.
See how you can see the ceiling light glowing through the paper windows?

We make little marks at the top of the door and door frame for where we want the hinges to be.
We want these fairly close to the edge, but not so close that it might rip out.
Our are about 1/16th of an inch in from the edge.

Use the yardstick to make matching ones on the bottom,
lined up as close as possible with the ones on the top.

Take a toothpick and carefully push it into the edge of the cardboard at the mark you made.

Take it out, leaving a small hole.
Do this in all four corners of the door frame, at the marks that you made.

Now take a toothpick and push it into the top of the door itself at the mark.
But this time, leave the toothpick in, and push it down so that a little less than an inch is poking out.

Start installing your doors at the bottom, by pushing the bottom toothpick into the matching hole in the frame.

Then, CAREFULLY bend the door to insert the top toothpick into the hole in the top of the frame,
then gently flatten the door out.

Repeat for the other door, and your doors are done!

The toothpick hinges* should give a nice, smooth, swinging motion to our doors,
allowing them to open and close easily.
*We didn't come up with this idea, though we wish we had.
Credit for this fabulous idea goes to the YouTube channel MyFroggyStuff
--Froggy has used this method in several of her projects.


We did some touch-up paint on the top of the door trim, too.

Now, as we were taking pictures, we noticed that our TARDIS was looking a little flat, and that the shadowboxes weren't as obvious as we wanted them to be.
So, we took some black paint and dry-brushed around the sides and under the top of the trim on each one, to essentially make our own "shadows" to bring out the detail.
(Dry brushing is a technique where you dip your brush in paint,
then dab off most of it on your palette
before lightly brushing it onto your project)


In the above picture, you can definitely see the difference that our dry brushing made.
The side on the left has had the "faux shadows" applied to it, while the side on the right hasn't.

We also made sure to add our faux shadows on the sides where the overlapping trim piece would cast a shadow.


All right, we're almost done! Just one final touch:
The characteristic "Police --public call-- Box" sign!
We used three text boxes in Microsoft Word,
with white letters on a black background,
to make our sign.
Then we cut them out, glued them together,
and sized it to be the right width for our TARDIS.


Then, we used a glue stick to glue it on to the front and the back.

The sides were a little tricky, because they have this gap.
 |
| Oops, this picture is sideways. Oh well, you can still see what we're trying to show you. |
So, we carefully and cleanly cut the sign in half,

...and glued it onto either side.

Since the sides of the TARDIS will be mostly shown at an angle, the gap in the sign isn't very obvious.

And voila! The main part of your TARDIS is officially done!


But... we can't exactly decide when and where to go
if we don't have something to tell the TARDIS when and where to go.
Stay tuned for Part 2: The TARDIS Console!
This is amazing!!
ReplyDeleteI love the lighting coming through the paper windows and the painted shadowing best. Really professional details.
Thank you! It was a lot of fun to make and I'm really happy with how it turned out. :)
Delete