All right, now that our TARDIS is complete,
we have to have some way to tell it when and where to go!
We need a console!
And it's not --quite-- as complicated to make as it sounds!
And it also easily comes apart in pieces for storage, too!
Want to build your own TARDIS console?
Read on to find out how!
YOU WILL NEED:
10 tri-fold boards -- yes, 10. We got ours from Dollar Tree again
1 empty oatmeal container
Scissors
White glue
Pencil
Glue sticks
Protractor
Ruler-- a clear one is helpful
Yard stick
Recycled paper
Acrylic paint that coordinates with the interior of your TARDIS
Stuff you want to decorate your console with
Let's get started!
First we're going to start with some math.
Yes, math.
Take it away, Kaya!
Kaya: Okay, guys, time for a geometry lesson!
So, from our observation,
most of the Doctor's consoles are a six-sided shape, aka a hexagon.
So, other than making a doomed-from-the-start attempt at free-hand drawing a hexagon,
how can we easily draw a nice, symmetrical one?
Well, as you can see from above, a hexagon can be evenly divided into six equilateral triangles.
(an equilateral triangle is a triangle that has sides that are all the same length)
So, the answer to our hexagon problem is in knowing some fun stuff about triangles!
Fun fact number one: If a triangle's sides are all the same length, then all the angles INSIDE the triangle will all be the same measure.
Fun fact number two: The inside angles of every triangle,
no matter the length of the sides,
add up to 180 degrees.
McKenna: 180 degrees?! That's really warm!
Kaya: That's not temperature degrees, smart-alec, I'm talking about degrees of angular measure. Back to the math lesson.
So, if all the angles inside the triangle add up to 180 degrees, and since our triangles are equilateral and all of the interior angles have the same measure,
then all we have to do is divide 180 degrees by 3 to find the measure of the interior angles.
180 / 3 = 60,
so the measure of each of the angles on the inside of the triangle is 60 degrees.
So, since our hexagon is made up of six of these triangles next to each other,
that means that the angular measure between each side is 60 + 60 degrees, or 120 degrees.
McKenna: Oookaaay, but how does that help us?
Kaya: Grab your protractor and your ruler and I'll show you!
StoryTeller: So... apparently I didn't take a picture of this, but you want to start with the middle panel of one of your tri-fold boards.
Fine the approximate center on one of the sides with the fold and make a mark,
and draw a 10-inch line centered on the mark (five inches on either side of the center mark), but away from the fold by about an inch (you can use the width of your ruler, with the ruler on the fold, to set your line out from the fold a bit).
You want to start this way to give yourself plenty of space.
Now, go to the end of your 10" line and grab your protractor.
Line up the line on the bottom of your protractor with the line that you drew.
Make sure the 90-degree line on the protractor is at the end of your line.
Then, find 120 degrees on your protractor, and make a mark with your pencil.
Using your ruler, draw a 10" line from the end of the first line,
passing it through the mark you made at 120 degrees.
This new line should be at an angle of 120 degrees to the first line.
Repeat at the end of the new line, once again setting up your protractor and marking 120 degrees.
Here's a close-up picture to show how we line up the ruler, with the 0 mark at the end of the first line, and using the 120 degree mark to angle it
(the 120 degree mark is on the cardboard right near the ruler's 3" mark).
Here's our completed hexagon.
It didn't turn out completely symmetrical due to measuring error
-- the last side is slightly shorter than the others--
but it's a close enough approximation to work.
Use your yardstick to draw lines across your hexagon to find the approximate center.
Now, we could try drawing a circle in the middle of our hexagon using a lot of fancy math.
In fact, we tried doing it the fancy math way, and then decided it was overkill.
So instead, we're going with the very technical and precise "eyeball it" method.
Put your oatmeal container in the center of your hexagon.
Use the lines going across it as a guide, and shift your oatmeal container around until it's as close to center as you think you can get it.
We found that leaning directly over it to shift it helped with getting it centered.
Trace around your oatmeal container to make a circle in the middle.
Next, cut out your hexagon using your scissors.
To cut out the center circle, CAREFULLY stab it with an old pencil...
Keiko: MWAHAHAHA!
StoryTeller: *rolls eyes*...to make a hole in the center to start cutting from.
Carefully cut out the circle.
We found it helpful to cut along the lines first to create "pie wedges" to then cut out.
Grab your oatmeal container and try pushing it through the middle.
It should fit snuggly, but not so much that it's impossible to shove through.
Make adjustments as necessary.
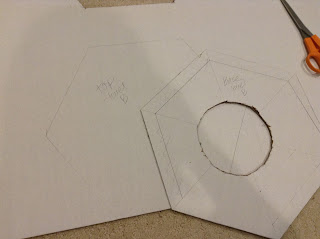
Take your hexagon with the hole cut out of the middle and trace it onto another tri-fold board, and cut it out.
Try it on for size.
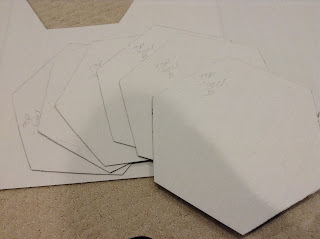
You are going to cut 4 of these big ones--
3 with a hole in the middle,
1 without a hole.
Label the three with a hole as "top, level A."
Label the one without a hole as "base, level A."
Take your original cutout, and trace it
-- and the hole in the center--
again.
This time, draw the spoke lines across it, from corner to corner (they're a little faint in this picture, but they are there).
Measure in 3 inches from the corner, along the spoke, and make a mark.
Do this at each corner, then connect the marks to make a smaller hexagon with a circle in the middle.
Cut out three of these.
These are part of the base. Label them "base, level B" or something like that.
Also, in addition to labeling them, we recommend labeling each layer near the SAME SIDE.
Since our hexagons aren't entirely symmetrical, having some sort of mark
--a label, a star, a smiley face, something--
to indicate "this side is the side that lines up with the other marked side"
makes it way easier to get them lined up with each other.
Trace your smaller hexagon again, but this time without the circle in the middle.
Cut it out.
Trace your non-hole small hexagon again, and cut out 5 more,
for a total of 6.
Label these "Top, level B."
Just to double-check our sizing, we try setting our AG computer on the console,
because we want to include it on the finished thing.
Looks good.
(Okay, actually we checked the sizing BEFORE cutting out six copies of that small hexagon,
but we didn't take a picture of that then)
Now, make one more tracing of your "top, level B" hexagon,
and draw spoke lines across it.
Measure 3 inches from the corner, along the spoke lines, and make a mark.
Do this at every corner, and connect the marks again,
to make an even smaller hexagon:
Like this.
Cut 6 of these smaller ones,
and label them "Top, level C."
Trying the computer on the console again.
Now, take your "Base, level B" template and trace the circle inside.
We traced it on one of the flaps of a board that we already cut up.
(We were also able to cut some of the "Top, level C" pieces out of the flaps, too)
Using your ruler, make marks around the outside of the circle.
I think we put our marks about 1.5" out.
Sketch around the circle, connecting the marks to create a ring.
Aaand we're back to cutting out more internal circles.
Ugh.
Anyway, cut 6 of these.
Label 3 of them as "Base, level C."
Label the other three as "Top, level A0."
And here are all the pieces for our console!
On the left we have the base,
with base level A on the bottom,
the 3 base level B pieces,
then the base level C rings on top.
Then the rings in the middle are the top level A0 pieces-- these go on the BOTTOM of the top part of the console.
And then all the top level A, B, and C pieces stacked.
Time to glue!
Now, this is important:
Only glue the pieces of each level to each other,
but don't glue the different levels together!
In other words:
Glue all the pieces of "Top, level B" together,
but DON'T glue them to levels A and C!
Glue all the pieces of "Base, level C" together,
but don't glue them to level B!
Etc.
Also, we recommend gluing the template piece
-- the first piece that you cut out for each level--
on the top, so the spoke lines are visible.
Once the glue has dried on the different levels,
wrap the edges with recycled paper.
(This is why we didn't glue the different levels together yet;
we needed to be able to wrap the edges cleanly)
To wrap the edges of the ring levels,
we cut notches in the paper to help it flatten out nicely.
We also didn't wrap the inside edge, because that would be a pain in the butt
and it won't really be visible anyway.
Now we stack and glue the levels together!
Use the spoke lines to get them lined up nicely.
We pulled out our army of paint containers again to weigh down the levels as they glued.
Also, once the top levels A, B, and C were dry,
we flipped it over and glued the top level A0 on the bottom,
being sure to line up the ring with the hole in the middle.
Here's the base level, all done!
Make sure you line up the inside edges of the hole in the centers of levels B and C nicely.
It doesn't have to be exact (in fact, it won't be exact),
it just has to be close.
Once the glue for the different levels is COMPLETELY dry (we left them overnight),
we grab our lovely assistant again to adjust the height of our console.
We wedge the oatmeal container into the hole in the base,
then put the top of the container into the hole in the underside of the top of the console.
Now, you can make your console as high or low as you want it
(or, at least, as high as the oatmeal container).
We want ours so that the top level A is at a comfortable table/counter height for the dolls.
Using our ruler, we find that this is about 8.5 inches,
while the top level A of the console is currently at about 10 inches.
This means that we need to cut the oatmeal container down by about 1.5 inches.
Using our ruler, we make marks 1.5" inches down from the top of our oatmeal container,
going all the way around.
Then, we connect them, creating a ring around the top of the container.
(We have a handy, flexible ruler that's great for this sort of thing)
Using your scissors, carefully cut off the top of the container,
leaving a little extra in case you need to make adjustments.
Measure it against your doll and adjust if needed.
We like ours the way it is.
Now, put your doll away so we can start painting without risking spattering her with paint.
We didn't get a picture of this,
but we used our white paint to "prime" our console pieces to create a nice,
even base to start with.
We especially needed this on the oatmeal container,
and used two coats of white on it to cover the design.
Paint your console using colors that coordinate with your TARDIS's interior.
We decided to keep the gold/bronze and silver color scheme with ours.
We painted the bottom of the top of the console first, and let it dry overnight,
...then flipped it over the next morning and put it on a piece of wax paper
so the dried paint wouldn't stick to the tablecloth
(acrylic paint can be slightly tacky even after it's dry),
and used the white paint to prime the top.
Here's the base, all painted, with the painted oatmeal container in the background.
Once the paint is all dry, it's time to decorate your console!
We found some pictures on the web that looked like good things to go on a TARDIS console
-- radar scanners, techie-looking world maps, clock faces, and lots and lots of dials.
We also got glue-on jewels to use for buttons and lights,
a bunch of random glass beads for more lights,
and those funny little clear, domed canisters from a gumball machine.
(These canisters came with donut key chains inside,
so we even got doll-sized mini donuts as a bonus!)
Set everything out on your console, but don't glue it down yet!
(And we definitely aren't gluing down our doll computer, heheh)
Just start by planning out where everything's going to go, and deciding if you need to add more stuff.
We're leaving the top part empty for now because we have something special to go on top that won't be glued on.
Once you're satisfied with the placement of everything,
remove anything that won't be glued on
(like doll computers, haha)
and start gluing!
We used a glue stick for the paper printables,
and white glue for the beads and jewels.
With the gumball machine canisters, we painted the lids gold,
flipped them upside-down,
glued a jewel inside,
and then glued the clear dome over the top
to look like fancy lights... or something.
Whatever it is, it looks cool and kinda Steampunk-y.
We did leave some space empty,
so that it doesn't look too cluttered and so the dolls can temporarily set things like laptops or microscopes on it if they want.
Keiko: Or toy dinosaurs.
StoryTeller: That's true, a spaceship console wouldn't be complete without toy dinosaurs. I should find some.
Once all your paint and glue is dry,
gather your pieces together.
Time to assemble your console!
First, put the oatmeal container into the base.
We purposefully did not glue these three pieces together, so that this way,
it can come apart and be easier to store.
Then set the console itself onto the oatmeal container.
Add the items that won't be glued down, like the computer.
And our goofy centerpiece: A solar-powered swimming fishy from the dollar store.
We're going to leave our centerpiece unglued so we can change it up if we want.
Maybe we'll use a snow globe at some point,
or find a mini battery-powered lava lamp.
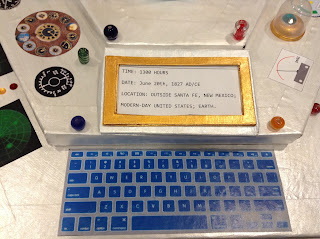
This display at the front was made using stacked "frames" made out of paperboard.
The top two frames are a whole frame,
but the bottom three had the top part cut off...
...so we can slide a piece of paper in and out of it to change the display.
We will mostly use this display to show the time, date, and location that Keiko and Company are traveling to.
And voila! Your console is done!
Your dolls are ready for adventures through all of time and space,
anywhere and everywhere,
every star that ever was,
wherever they want to start.


No comments:
Post a Comment